Forking CanESM
For generic information on forking, see Forking workflow references.
Creating Your Forks
As part of a forking workflow, the first thing you need to do is create your forks! whether you intend to modify them or not, forks must be taken for each and every submodule. To do so, follow the steps below.
Note
You only need to fork the repositories once! Thereafter you can interact with you forks as needed.
Navigate to the CanESM Repository and fork the repository into your namespace by clicking the “Fork” button on the project dashboard

which will bring you to a Fork Project menu. From here, select your own personal namespace, i.e.
At this stage, you should then be on your own personal version of the CanESM super repository. In the top left you should see something similar to,

with your name instead. Additionally, in the
sshaddress section you should see:git@gitlab.science.gc.ca:user123/CanESM.git
where
user123is replaced with your account ID.Fork the submodules by navigating to the project pages:
Warning
If you fail to fork all of the submodules, this will be fatal for usability. If you try to navigate to a submodule from within your fork and you get a “Not Found” error, you haven’t forked the repository.
(recommended) Disable the build feature for your forks.
Unless you want to setup automatic builds on your forks, which requires some knowledge of gitlab runners, it is recommended that developers disable this feature on their forks. If developers do not do this, their forks will ATTEMPT to launch continuous integration pipelines in the same way the central repo does. However, because a gitlab runner hasn’t been setup for their fork, the pipelines will ALWAYS fail, at no fault of the developer, producing un-needed notifications for the developer.
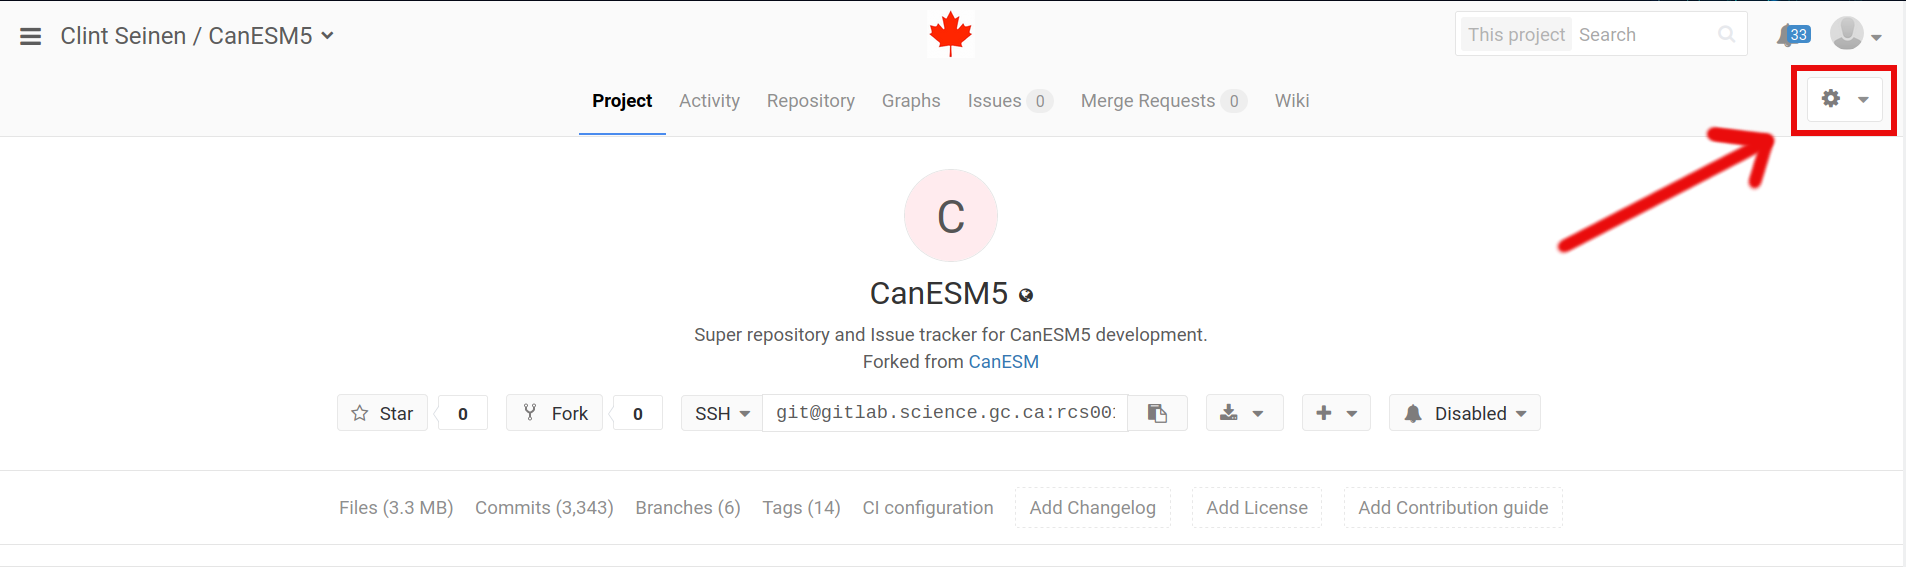
To disable this on your fork, navigate to the project settings menu, which is the small gear upper right-hand corner of the project dashboard, i.e.
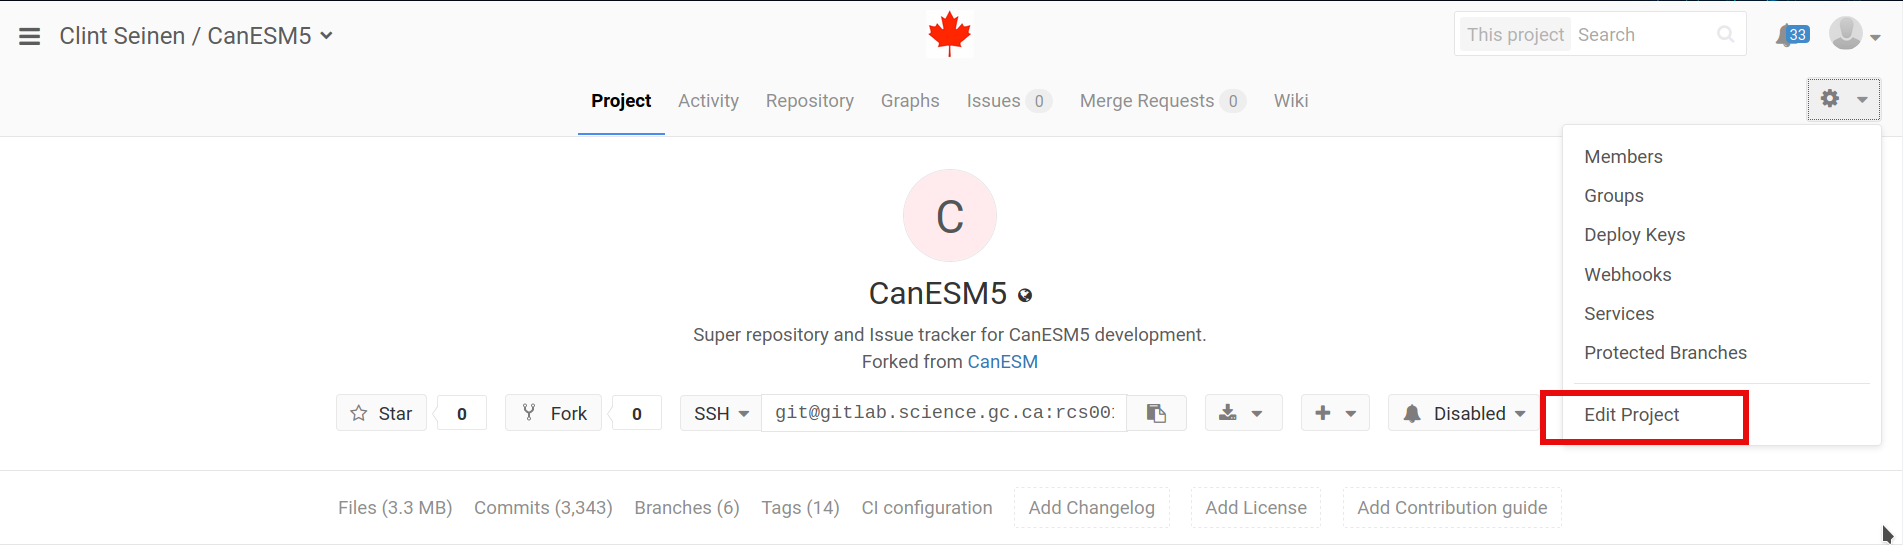
From the drop down menu, select “Edit Project”
and you should now see a “Project Settings” interface. Scroll down to the “Feature Visibility” sub-menu and take note of the “Builds” setting:

Open the drop down menu and set this to “Disabled:

then scroll down and select “Save Changes”, and with that the builds feature will be turned off!
The last step is to repeat this for the submodules!
Interacting With the Main Repo (and other remotes)
Due to using a forked workflow model, CanESM contributors need to be comfortable
interacting with multiple remotes. This section provides specific examples and details
about some of the common operations developers will need to do.
It should be noted that in the below sections, while it is assumed that the
on-disk repos have been cloned from user forks on the internal ECCC gitlab
server, i.e.
git@gitlab.science.gc.ca:user123/CanESM.git
and that the “other” remote we use as an example is the central repository at
git@gitlab.science.gc.ca:CCCma/CanESM.git
these directions can easily be applied to other, more generic remotes
Additionally, the instructions below utilize many of the internally made s-scripts. For information on these scripts, and how to accessed pre-installed versions on the ECCC machines, interested readers are directed here.
Adding a new remote to your on-disk repo
By default, when you clone down any repository git sets up the remote
url/name for you, where the default remote name is origin and it points
to the url you cloned from. For example if we clone down the CanESM repo
via
>> git clone --recursive git@gitlab.science.gc.ca:user123/CanESM.git
then the default remote setup will be
>> git remote -v
origin git@gitlab.science.gc.ca:user123/CanESM.git (fetch)
origin git@gitlab.science.gc.ca:user123/CanESM.git (push)
Now this setup is all great and good if you only care about the versions contained in your fork. However, you will likely want to be able to do things like:
update your code from the central repo, or
compare, merge code from another user’s fork
To do this, you will need to add new remotes!
To add new remotes across all submodules and the super-repo, developers can
manually navigate to each directory and run the raw git remote add <name>
<url>, or to make things easier, they can utilize git sremote. Specifically, if
we want to add the central (internal) repository as a remote, noting that it
belongs to the CCCma group, all the you need to run is:
>> # at the super-repo level
>> git sremote CCCma
Note
replace CCCma with another git user/group name if you want to add a differnent
remote.
After that, in the super-repo (and each submodule), you should now see
>> git remote -v
origin git@gitlab.science.gc.ca:user123/CanESM.git (fetch)
origin git@gitlab.science.gc.ca:user123/CanESM.git (push)
CCCma git@gitlab.science.gc.ca:CCCma/CanESM.git (fetch)
CCCma git@gitlab.science.gc.ca:CCCma/CanESM.git (push)
Note
if you would prefer to reference this new remote with a different name (as opposed to CCCma),
add the desired name as the second argument to git sremote.
Fetching changes from another remote
The easily fetch changes across all repos, we utilize the git sfetch command. By default,
it fetches changes from origin, however you can easily fetch changes from a specific
remote by providing arguments to git sfetch. For example, to fetch changes from the
remote we added above, we would execute:
git sfetch CCCma
if we want to update the remote references for all branches that live on the main repo. If we only care about one branch, we can add a second argument, i.e.
git sfetch CCCma develop_canesm
will only fetch updates to develop_canesm.
Comparing across remotes
Assuming you’ve already added the necessary remote, you can easily compare your branches across remotes by simply executing
git diff <remote-name>/<branch-to-compare-to>
in each repository. For example, if we want to compare our current branch to develop_canesm on the
central repo, we would execute
git sfetch CCCma develop_canesm # if not already done
git diff CCCma/develop_canesm
Merging in updates from other remotes
To illustrate how to merge in changes from another remote, lets consider
the case where we want to update our local version of develop_canesm, with that from the
central repository, which has been added as a remote with the name CCCma (see
here). All that needs to be done is
git scheckout develop_canesm     # checkout your local version
git sfetch CCCma develop_canesm # update what your repo knows about the central develop_canesm
git smerge CCCma/develop_canesm develop_canesm # merge!
The push the updated branch to your fork via
git spush origin develop_canesm # assuming your fork's remote name is set to 'origin'
Warning
While merging is required by developers, it can go sideways. To reduce the chance for problems, it is recommended that:
developers use
git statusandgit logto confirm that their repo is in the expected state before executing the merge and,developers use
git statusafter the merge to confirm that the merge executed correctly and completed before performing any othergitoperations
For the general case, where a developer might want to merge in changes from branchA
on remote remote2, onto their local branchB, the sequence of commands would look like:
git scheckout branchA
git sfetch remote2 branchB
git smerge remote2/branchB branchA
Other Considerations
Allowing other developers/accounts to push to your fork
Some users often end up using multiple accounts to interact with the same repository (i.e. those with “production” accounts). This has worked in the past, but now when users fork the desired repositories, they default to only having one member - the user who forked the repo - and thus, any account (other than that used to fork the repo) will not be able to push to the fork, and will get an error message like:
GitLab: You are not allowed to push code to this project.
fatal: Could not read from remote repository.
Please make sure you have the correct access rights
and the repository exists.
when they try to do so. Fortunately, it is possible to give other accounts permission to push, and this sections lays out how to do so, noting that this process only needs to be done 1 time / desired user / forked repo.
With that said, to add additional accounts:
Navigate to the ‘member’s page from your repository dashboard (the repo’s homepage) by selecting the gear in the upper right and clicking on “Members”
Add the desired account id by searching for it in the field under “Add new user to…” and select the desired account
Change the permission to “Developer”
Select “Add to Project”
and thats it! Again, this need to be done for each repo.
(Internal Use Only) Launching runs from your fork
As stated here, all production runs are still required
to happen from the main repository, after user updates have been merged into develop_canesm.
However, during the development process, developers will want to test the changes on their forks.
Fortunately, the process for doing so remains almost identical to that laid out
here, except that an additional argument must be given
to setup-canesm. Specifically, the remote url must be given via the repo=
argument, for example:
setup-canesm runid=myrun config=ESM ver=mybranch repo=git@gitlab.science.gc.ca:sci123/CanESM.git
After this one difference, the rest of the instructions remaing the same.
Note
If the repo= flag is not given to setup-canesm, it defaults to using
repo=git@gitlab.science.gc.ca:CCCma/CanESM.git.