CanESM version control
The section CanESM source code, provides an overview of the source code repositories and structure. The CanESM version control system and development workflow make use of advanced features, such as nested submodules and forks, and a series of CanESM-specific conventions are used. This chapter provides detailed guidance for interacting with the CanESM repositories and on the workflow used for development.
Note
CanESM developers should be comfortable using git.
This document is not meant to be a basic git tutorial.
Please refer to the abundant online documention.
CanESM development workflow
Note
This content is covered in the CanESM screencasts
Modifying CanESM provides step-by-step instructions for following the CanESM development workflow. This section provides a broader conceptual picture of the workflow and further practical guidelines. For context on how changes are brought together to form a new model version, see CanESM Development Cycle.
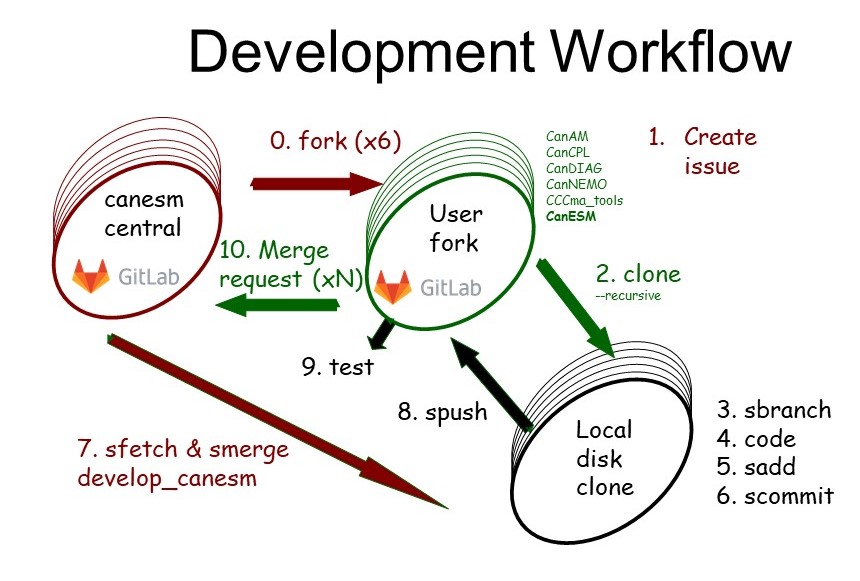
The CanESM development workflow
Forking
The CanESM development uses a forking workflow model. This means that individual developers create forks (copies) of the official repositories on gitlab, rather than all sharing a single central repository. This approach helps to prevent branch clutter in the central repository.
Detailed practical guidance is provided on Forking CanESM.
In working with forks in the CanESM context, there are a few things to note:
User forks are to be used for development, however CCCma production runs MUST continue to occur from clones/setups off the central repo.
Issues should continue to be posted on the central repository.
Feature branches
In CanESM development we also use feature branch development. What this means is that users create named branches for each discrete piece of development that they undertake. The resulting branches are pushed to the users forks, and merge requests are made back to the central repository. We encourage users to use new branches / MRs for each discrete piece of working, rather than bundling many changes together, since discrete blocks of work make merges and code reviews easier. An example branching diagram can be seen in CanESM release workflow.
Submodules
The CanESM development workflow is complicated by the fact that the CanESM code base includes submodules. It is critical that the submodules and super repository are handled in a consistent manner, and this is further detailed in the following section.
Code changes
Developers must follow the Fortran Style Guide when implementing code changes.
Developers must also isolate any bit-pattern altering code changes using namelist switches and in-code branches. This allows the original bit pattern to be preserved when a new feature is merged back to
develop_canesm. That is, changes that alter the bit pattern of the model will generally not be accepted. Here, bit-identity means bit-identical with the same simulation from the current official minor version of the model, under the production level compilation flags. Changes that maintain the bit pattern using a lower (non-optimized) compilation, will be considered, but might experience delays in their integration. Bit-altering changes at the debug-optimization level will require significantly more extensive vetting and justification before being accepted, and this will only occur in cases where switching a change is not possible. When such changes are accepted (e.g. array handling updates), the patch version number will be incremented to signal the change to users.
Merging back
Feature branches should be merged back early and often, so that any emerging code conflicts can be resolved. Feature branches should not diverge from
develop_canesmfor long periods. At a maximum, feature_branches must be updated using the tagged release made at the end of each development cycle - as the starting point for the next cycle.Note that there is no requirement whatsoever that a feature be finished or functional in order to be merged back. As long as the feature is appropriately isolated by a namelist switch, even a bare stub can be merged back to
develop_canesm. In fact, frequent small merges back are highly encouraged (as above). Any merge back must be tested to maintain the bit pattern of the current recent minor model version, with the switches for the new feature deactivated.The readiness for feature branches to be merged back is indicated by making a Merge Request (MR) from the users fork and feature branch, to
develop_canesmin the central repository.Before being merged back, feature branches will have their code reviewed, normally by experts from the relevant area. Developers should expect feedback. MR’s must pass Continuous Integration testing prior to being merged (must be functional and ideally bit identical). Ultimately, acceptance of a feature into the code base falls to the lead of the relevant model component working group.
Interacting with the CanESM submodules
For generic information on submodules, see Git submodule references. For an overview of the submodule structure in the CanESM code see Code structure.
When working with the CanESM source code, developers should be aware of the following:
To clone to super-repo and the submodules in one command, developers should use:
git clone --recurisve [Git url]
To aid developers and maintainers in executing merges across all components, along with tracking what versions of the sub-components work with each other, feature branches should be created across all repositories (i.e. your branch
feature1should exist in each repository).
The S-Scripts
To aid in working across the various submodules, the technical development
team has created a suite of git-s* scripts (or “s-scripts”), that are
version controlled here. Using these
scripts automates operations across all the submodules, and helps to reduce both
user workload and human error. It is recommended to use these scripts when interacting
with the CanESM repositories.
To gain access them, you can manually add the path to them to your PATH
variable, or if operating on the internal ECCC machines, you can run:
. /home/scrd102/generic/sc_cccma_setup_profile
which setups the “CCCma Environment”. Once done you should be able to utilize the following helper scripts.
git sbranch ARGS:used to execute
git branch ARGSacross all reposgit scheckout ARGS:used to execute
git checkout ARGSacross all reposgit sadd:used to execute
git add -Aacross all repos, which stages all possible changes.As discussed here, when used in combination with
git scommit, can be used to easily stage/commit all changes across the repositories.git scommit ARGS:used to execute
git commit -a ARGSacross all repos.As discussed here, when used in combination with
git sadd, can be used to easily stage/commit all changes across the repositories.git spush remote-name branch-name:used to execute
git push remote-name branch-nameacross all repos.git sfetch ARGS:used to execute
git fetch ARGSacross all repos.git smerge branch1 branch2:used to merge
branch1intobranch2across all repos.Note: before merging this tool checkouts
branch2.git sdel branch-name:used to delete branch
branch-nameacross all repos locally and attempts to delete remote versions onorigin(the default remote)git sfed ARGS:executes
ARGS(which could be another command) across all submodules, taking a bottom up approach.Note: this script is mainly used within other s-scripts.
git sremote username <remote-name>:used to add a new remote for all repos, where it assumes that the new remote url follows the same structure as that of the existing remote urls in the project (i.e.
git@gitlab.com:user123/canesm.gitorgit@gitlab.science.gc.ca:user123/CanESM.git), but switches out the existing user/group-name withusername. If the optional argumentremote-nameis given,git sremotesets it to be the new remote’s name, else it makes the nameusername.As an example, lets say we have super-repo with the following remote setup:
>> git remote -v
origin  git@gitlab.com:cseinen/canesm.git (fetch)
origin  git@gitlab.com:cseinen/canesm.git (push)
Note
for developers who cloned from the internal ECCC
gitlabserver, the remote url would look like:git@gitlab.science.gc.ca:user123/CanESM.git
Then, by executing:
>> # at the super repo level
>> git sremote nswart remote2
git sremotewould add remotes for each repo with urls that look like:git@gitlab.com:nswart/${REPO_NAME}.gitwhere
${REPO_NAME}is replaced with the project name of the repo (i.e.canesm, orcandiag).git sremotewould also set the remote-name toremote2, so the output ofgit remote -vwould look like:>> git remote -v origin git@gitlab.com:cseinen/canesm.git (fetch) origin git@gitlab.com:cseinen/canesm.git (push) remote2 git@gitlab.com:nswart/canesm.git (fetch) remote2 git@gitlab.com:nswart/canesm.git (push)
If the second argument was not provided,
remote2would be replaced with theusernameargument, which wasnswart.Note
for developers using the internal ECCC
gitlabserver, the new url would look like:git@gitlab.science.gc.ca:nswart/CanESM.git
CanESM VCS Tutorials and Screencasts
To aid contributors in working with the CanESM version control system, the technical development
team has prepared the following screencasts tutorials:
CanESM version control 1: Repository layout and philosophy: https://youtu.be/h6cEF-Q7-Qw
CanESM version control 2: Establishing and navigating on disk repos: https://youtu.be/BXrqdJVsTQI
CanESM version control 3: Remotes and forks: https://youtu.be/BA21xRcqFLg
CanESM version control 3b: Clarification on forks: https://youtu.be/D4qQr-n9Z7E
CanESM version control 4: Making changes to the source code: https://youtu.be/YIjYPJFD-QE
CanESM version control 5: Merge request: https://youtu.be/tCYNiP3oD5o
CanESM version control 6: Merging branches: https://youtu.be/tst-hxAysgQ
CanESM version control 7: Handling merge conflicts: https://youtu.be/8by7Qo53tdU
CanESM version control 8: Undoing a merge: https://youtu.be/CLiMO09Ve3M