Modifying CanESM
Introduction
This document describes the fundamental steps required to modify the CanESM repository.
Further details can be found in CanESM version control.
It should be noted that the CanESM repository is built
as a “super-repo”, where various components are tracked as “sub-repositories”
or “submodules”. To help interact with these submodules, special git s* scripts
have been added to the super-repo, under CCCma_tools/tools, and are shown below
in various command examples - the suite of these tools, known as “s-scripts” are
described here.
Making Changes
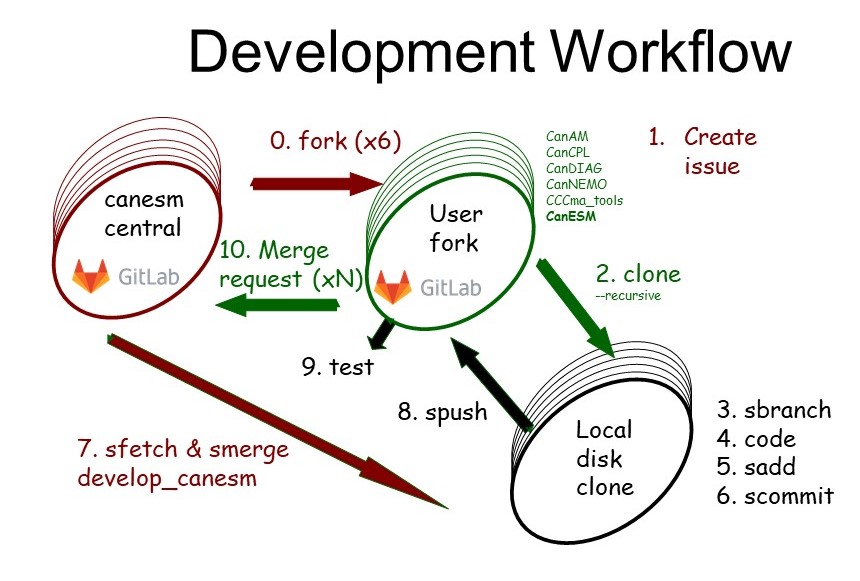
The CanESM development workflow
Fork repos
(ONLY ONCE) create forks of the CanESM repositories (as described here).
Create an issue
Before beginning work you should create a new issue or update an existing issue in the central repository describing your intentions. This allows us to keep track of what was done when and why. When setting up the issue, you should have a clear starting point (i.e. super-repo SHA1).
Clone the CanESM super-repo, to create an on-disk repo
git clone --recursive git@GIT_ADDRESS.git
where
git@GIT_ADDRESS.gitis to be replaced with the desired remote address - for example:git@gitlab.science.gc.ca:CCCma/CanESM.git: central, internal ECCC repositorygit@gitlab.com:cccma/CCCma.git: central, public repositorygit@gitlab.science.gc.ca:user123/CanESM.git:user123’s fork, internal ECCC repositorygit@gitlab.com:user123/CCCma.git:user123’s fork, public repository
Note
The CanESM development workflow operates as a “forked workflow”, meaning that developers are not able to push to the central repositories. Therefore, it is recommended that developers clone directly from their user fork.
Checkout named branches
To begin development, users should create and checkout a new branch in the super-repo, and in each submodule. Instead of navigating into each repository, developers can simply use
git sbranchorgit scheckoutat the super-repo level. For example, if the branch does not yet exist, then:# at the super repo level git scheckout -b BRANCH-NAME
where BRANCH-NAME is the name of your custom branch. If the BRANCH-NAME already exists, then do
git scheckout BRANCH-NAME
You can now go ahead and modify any code you like (in any submodule).
Note
For older versions of
git scheckout, the-boption might not work. If this happens, run:git sbranch BRANCH-NAME # create the branch without checking it out git scheckout BRANCH-NAME # check it out
Warning
It is important that developers are aware of the branches/commits that are checked-out in the submodules before proceding with development, particularly just after cloning the code (whether through
git cloneor any of thesetup-*scripts). Right after the clone, the submodules are NOT checked out to a specific branch and are instead in a “Detached Head State”, which means that instead of a branch the sub-repo is checked out to the specific commit that are registered to the super-repo branch. To alleviate this, developers must checkout the desired branch (across all repos) before proceding with development.To make it easier to check branches across all repos, developers can use
git sbranchwhich affords output like:
* (HEAD detached at 6b95543)
if any repo is in a detached head state.
Apply code changes
Change any required source code following the Fortran Style Guide. Also ensure you use switches as necessary to maintain the bit pattern of the model.
Add the changes
using s-scripts:
To seamlessly stage changes and new files across all the submodules and the super-repo automatically, developers can use the s-script version of
git add.git saddwhich will navigate into each submodule and stage
anynew files or changes.using raw git commands:
As mentioned above, using the s-scripts will stage all new files and changes. Some developers may wish to avoid this (i.e. if they don’t want to commit everything at once, or if they have temporary files lying around). If this is the case, developers should:
Navigate to the desired submodule.
git add/git committhe desired changes.Navigate back to the super-repo.
git add/git committhe new sub-module commit.
Commit the changes
Once required changes are added, developers can then commit all the changes by executing:
git scommitwhich will then require you to leave custom commit messages for each repo modified.
Merge in the main branch and handle any conflicts.
Once you are satisfied with your changes, you are responsible for confirming that your changes do not conflict with other work done to the main branch,
develop_canesm. To do this, you must merge indevelop_canesm(from the central repository) into your development branch, handle any conflicts, and commit/push the updated branch.The process for handling mergers, and accompanying documentation, can be found here. In practise, users may wish to perform steps 4-9 several times during development, skipping this merging step. However, the final, conflict free merge request (10) must have been tested.
Push changes back to gitlab
The easiest way to push changes back to the desired remote is to use the s-script version of
git push. Specifically:# at the super-repo level git spush REMOTE-NAME BRANCH-NAME
where
REMOTE-NAMEis the name of the remote you wish to push too. In most casesREMOTE-NAME, will beorigin, which by default points to the remote from which you cloned the respository in the first place - more on this can be found here.Launch a test run from gitlab
Once the changes are committed and pushed, developers should then launch a test run from scratch, using the modified code. To do this, see the running guides for:
Create a merge request upon completion
Once you have determined that your updates work with the
HEADofdevelop_canesmmerged into your branch, you should then make a merge request (MR) on gitlab, between your branch anddevelop_canesm, for the super-repo and every affected submodule.As part of this MR, you must select at least one person to review your changes, and:
explain what this MR is designed to fix/update
provide the reviewer with a description of how you tested your changes
Note
As part of this merge request, please provide a link to the submodule MRs as part of the main MR at the super repo level.
To help in writing up a clear merge request, the
CanESM_Merge_Requesttemplate has been provided and can be selected from the “Choose a template” drop down menu.For additional guidance on opening and writing merge requests, please consult the following documentation:
(internal use only) From
gitlab.science: How to create a merge request.Note that when making a merge request from a user fork, the merge request should be initiated from the fork. Confirm that the target branch is on the upstream/central repository (see ‘Select target project’ drop down menu).
From
gitlab: How to create a merge request.Note that this documentation is more comprehensive than that on
gitlab.science, but not all the features laid out here are available for internal merge requests
Markdown Guide - for formatting your merge request
Upon approval of your changes, and a passing of a Continuous Integration (CI) pipeline, your code may be officially accepted and merged into
develop_canesm.
Deleting old branches
It is recommended that users clean old branches from their repositories
once the changes are merged into the main repo’s main branch. To do this
across submodules, both locally and on the remote pointed to via origin
git sdel BRANCH-NAME
Note
git sdel currently only supports interacting with origin and automatically
attempts to delete both local branchs and those on origin. If users would like
different functionality, they are encouraged to consult with other online documentation.